
This lesson is about a very practical mobile cybersecurity skill: putting yourself between an Android application and its backend so you can understand what the app sends, what the server returns, and what happens when the network behaves badly.
The goal is not to attack random apps. The goal is to learn traffic analysis in a controlled lab environment, using an emulator and a deliberately vulnerable training application.
By the end of this lesson, you should understand:
- why QA engineers, security testers, and mobile developers intercept traffic;
- how proxy-based interception differs from VPN routing;
- why HTTPS traffic is not automatically readable in a proxy;
- how CA certificates make HTTPS inspection possible;
- why SSL pinning breaks normal proxy interception;
- where Frida and Objection fit when standard proxy setup is not enough.
1. Why intercept mobile traffic?
Mobile applications often look simple from the UI side. You tap a button, a screen changes, a transaction appears, an image loads. Under the hood, the app is constantly talking to APIs.
Traffic interception lets you open that hidden layer.
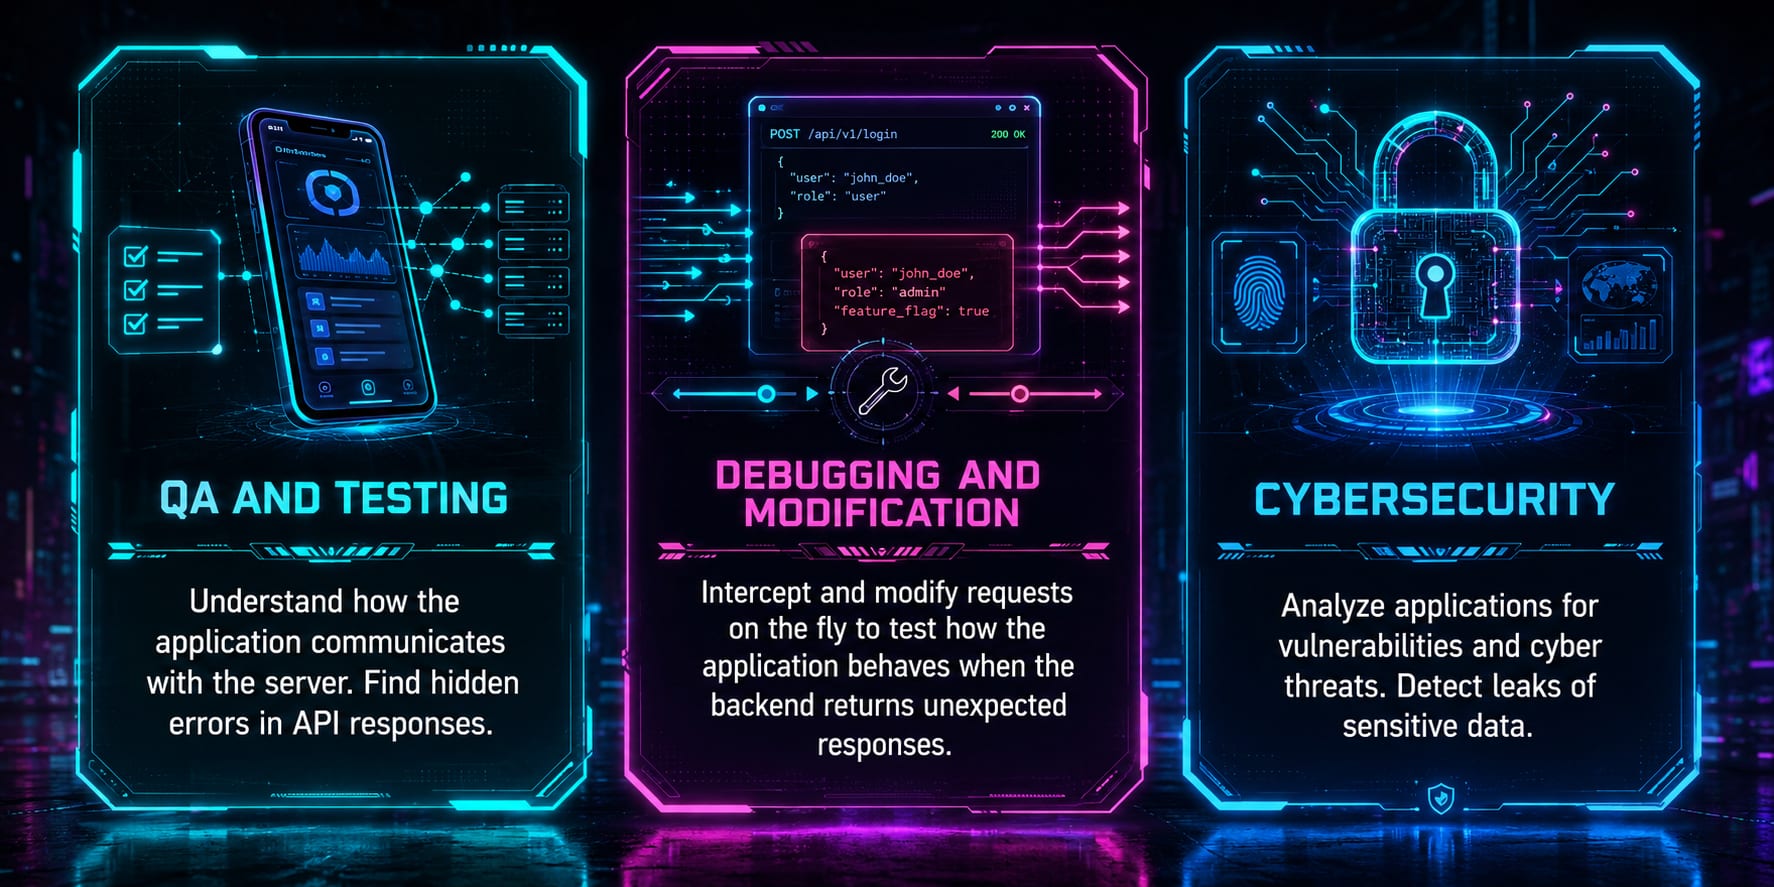
There are three main reasons to do it.
QA and Testing
For QA, interception helps answer questions like:
- Did the app call the correct endpoint?
- Did it send the correct request body?
- Did it handle a bad response correctly?
- Is the API returning an error that the UI hides from the user?
- Does the app retry requests too aggressively?
This is useful because many mobile bugs are not purely UI bugs. They are contract bugs between the app and backend.
Debugging and controlled modification
A proxy can modify requests and responses while the app is running. This is powerful for testing edge cases without asking backend developers to create fake data for every scenario.
For example, you can simulate:
403 Forbidden;500 Internal Server Error;- an empty list;
- a slow response;
- a missing field;
- an unexpected value.
Cybersecurity analysis
From the security side, traffic interception helps find issues such as:
- sensitive data sent in cleartext;
- tokens or passwords appearing in requests;
- weak authorization logic;
- insecure endpoints;
- data leaks in API responses;
- missing certificate validation.
In a proper security workflow, traffic interception is one of the first ways to understand how a mobile app really behaves.
2. VPN vs proxy: similar idea, different purpose
A VPN and a proxy both sit between a client and the network, but they are not the same tool.
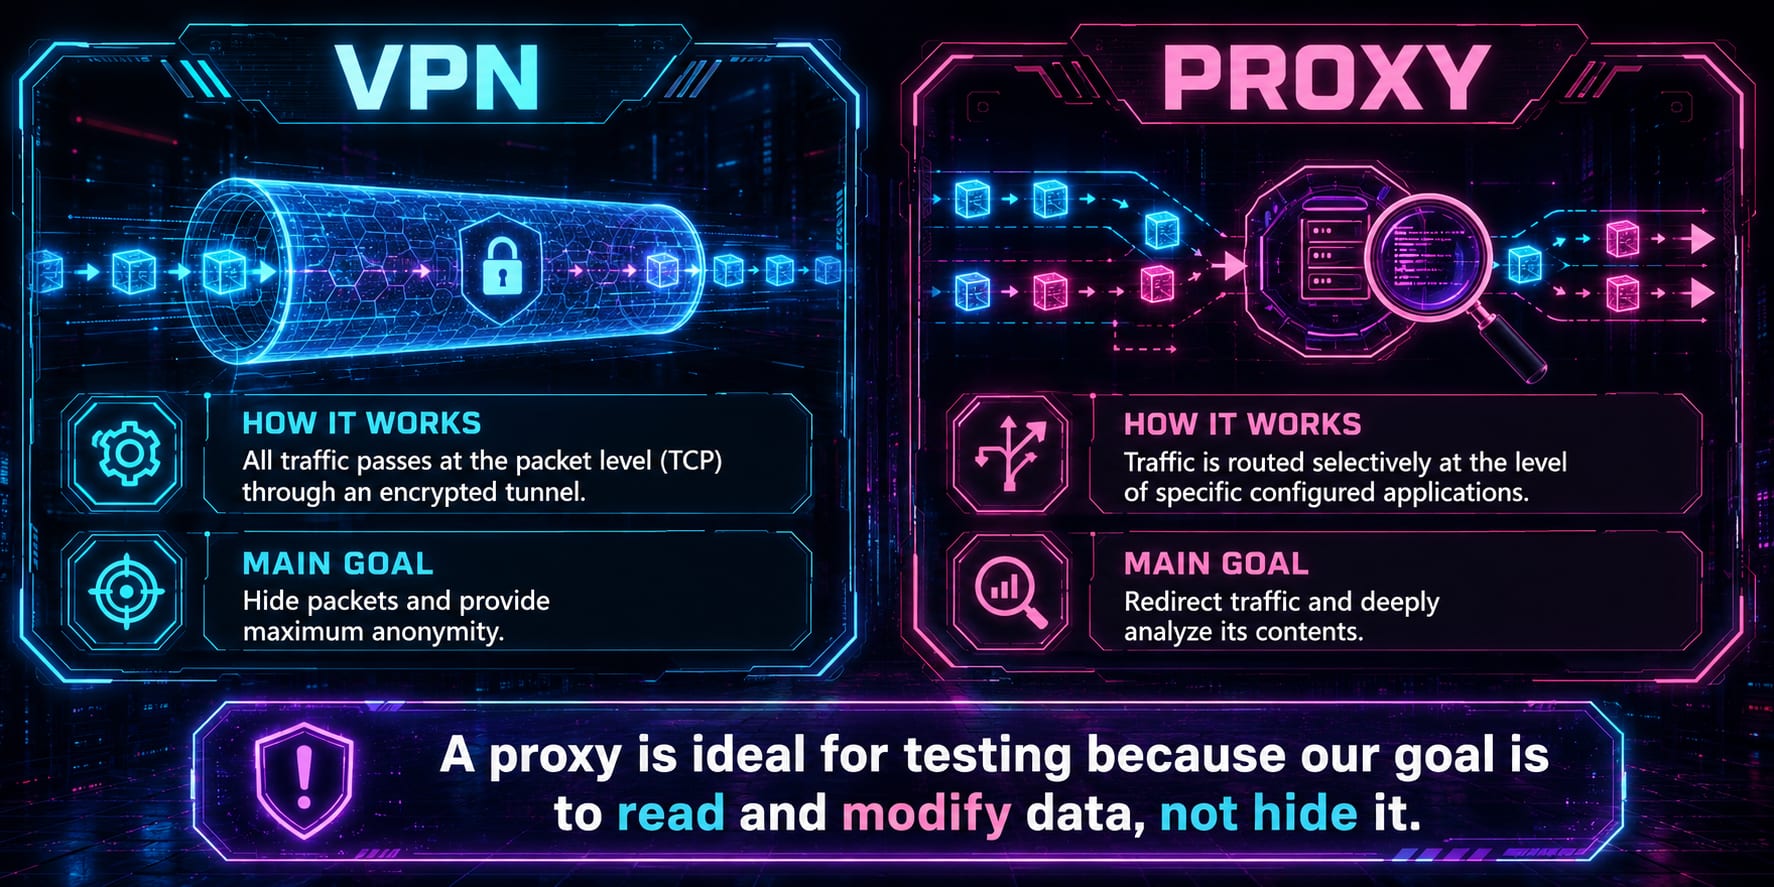
A VPN routes traffic through an encrypted tunnel. The main goal is usually privacy, network routing, or hiding traffic from the local network.
A proxy is more selective and more useful for testing. In a mobile testing lab, the proxy is not there to hide traffic. It is there to inspect and manipulate traffic.
For this lesson, the proxy approach is the correct approach because we want to read and modify HTTP/HTTPS requests, not hide them.
3. MITM: the basic architecture
A proxy-based traffic interception setup is a controlled Man-in-the-Middle position.
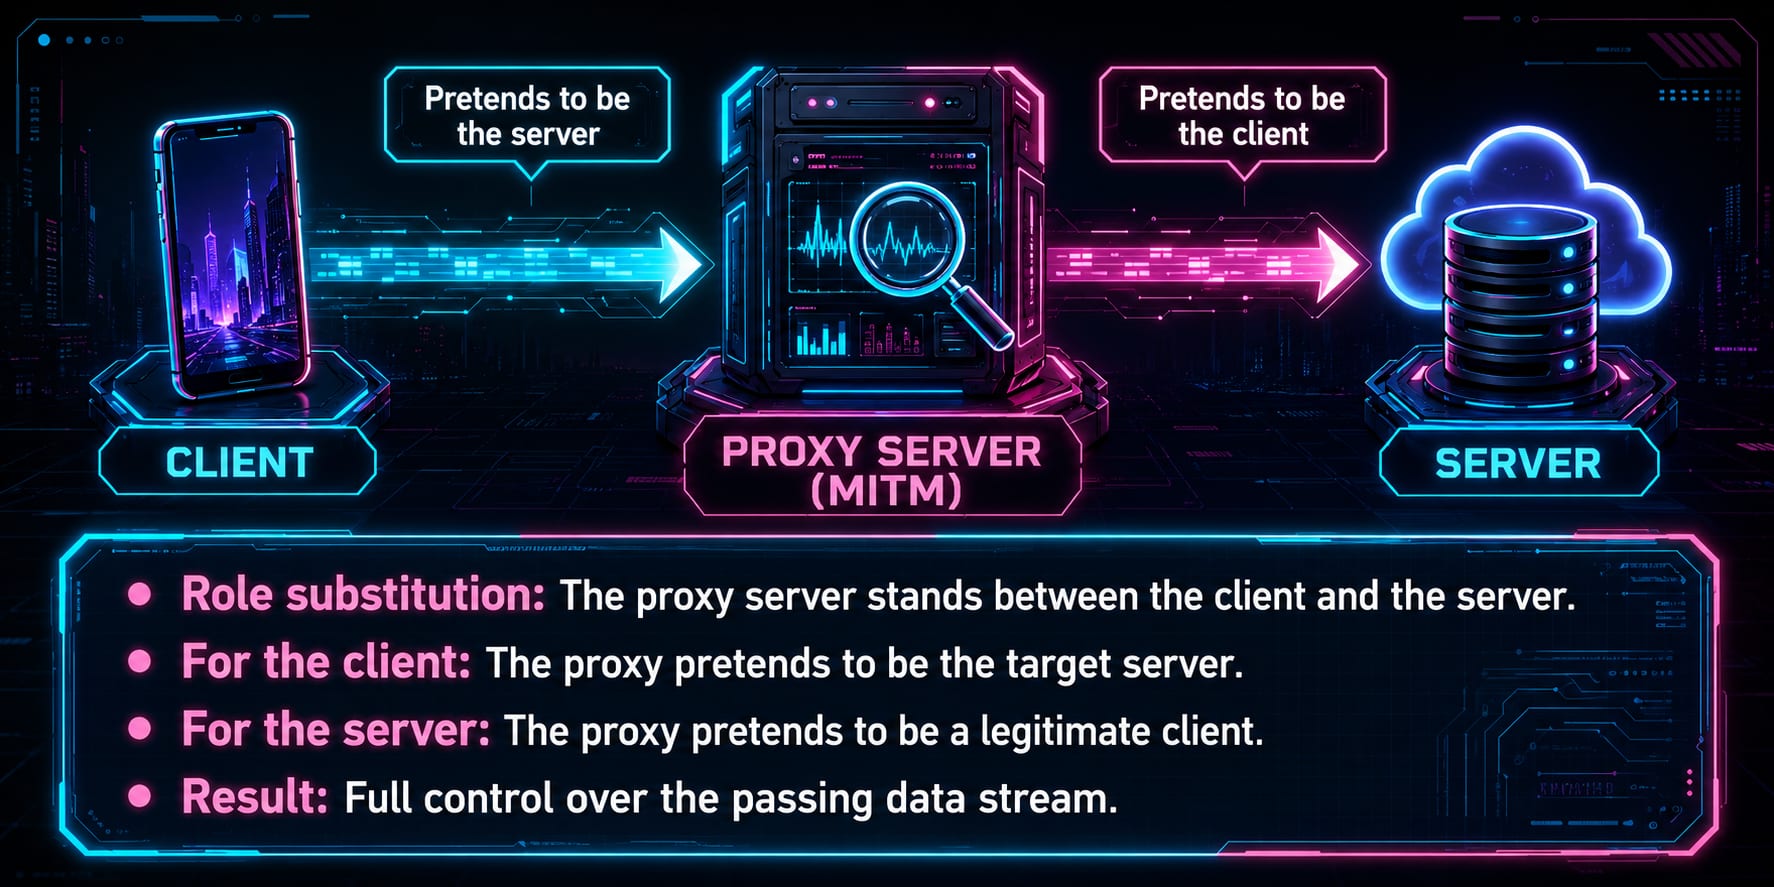
The proxy server stands between the mobile client and the real backend server.
For the app, the proxy pretends to be the server.
For the server, the proxy pretends to be the client.
That gives the tester a controlled point where requests and responses can be inspected, filtered, blocked, or modified.
In this lesson, Charles Proxy plays that role.
4. Tools used in this lesson
Use official sources when installing tools:
| Tool | Purpose | Official URL |
|---|---|---|
| Android Studio | Create and run Android Emulator | https://developer.android.com/studio |
| Android SDK Platform Tools | ADB and Fastboot | https://developer.android.com/tools/releases/platform-tools |
| Charles Proxy | HTTP/HTTPS proxy and traffic viewer | https://www.charlesproxy.com/download/latest-release/ |
| Node.js | Runtime sometimes needed by mobile tooling workflows | https://nodejs.org/en/download |
| Python | Required for pipx, Frida tools, and Objection setup | https://www.python.org/downloads/ |
| pipx | Isolated Python CLI app installer | https://pipx.pypa.io/ |
| Frida | Dynamic instrumentation toolkit | https://frida.re/docs/installation/ |
| Frida releases | Download matching frida-server binary | https://github.com/frida/frida/releases |
| Objection | Runtime mobile exploration toolkit built on Frida | https://github.com/sensepost/objection |
For Windows students, install Android Studio, Charles, Node.js, and Python first. Then install the Python-based tools from the command line.
5. The interception workflow
The basic interception setup has three stages.
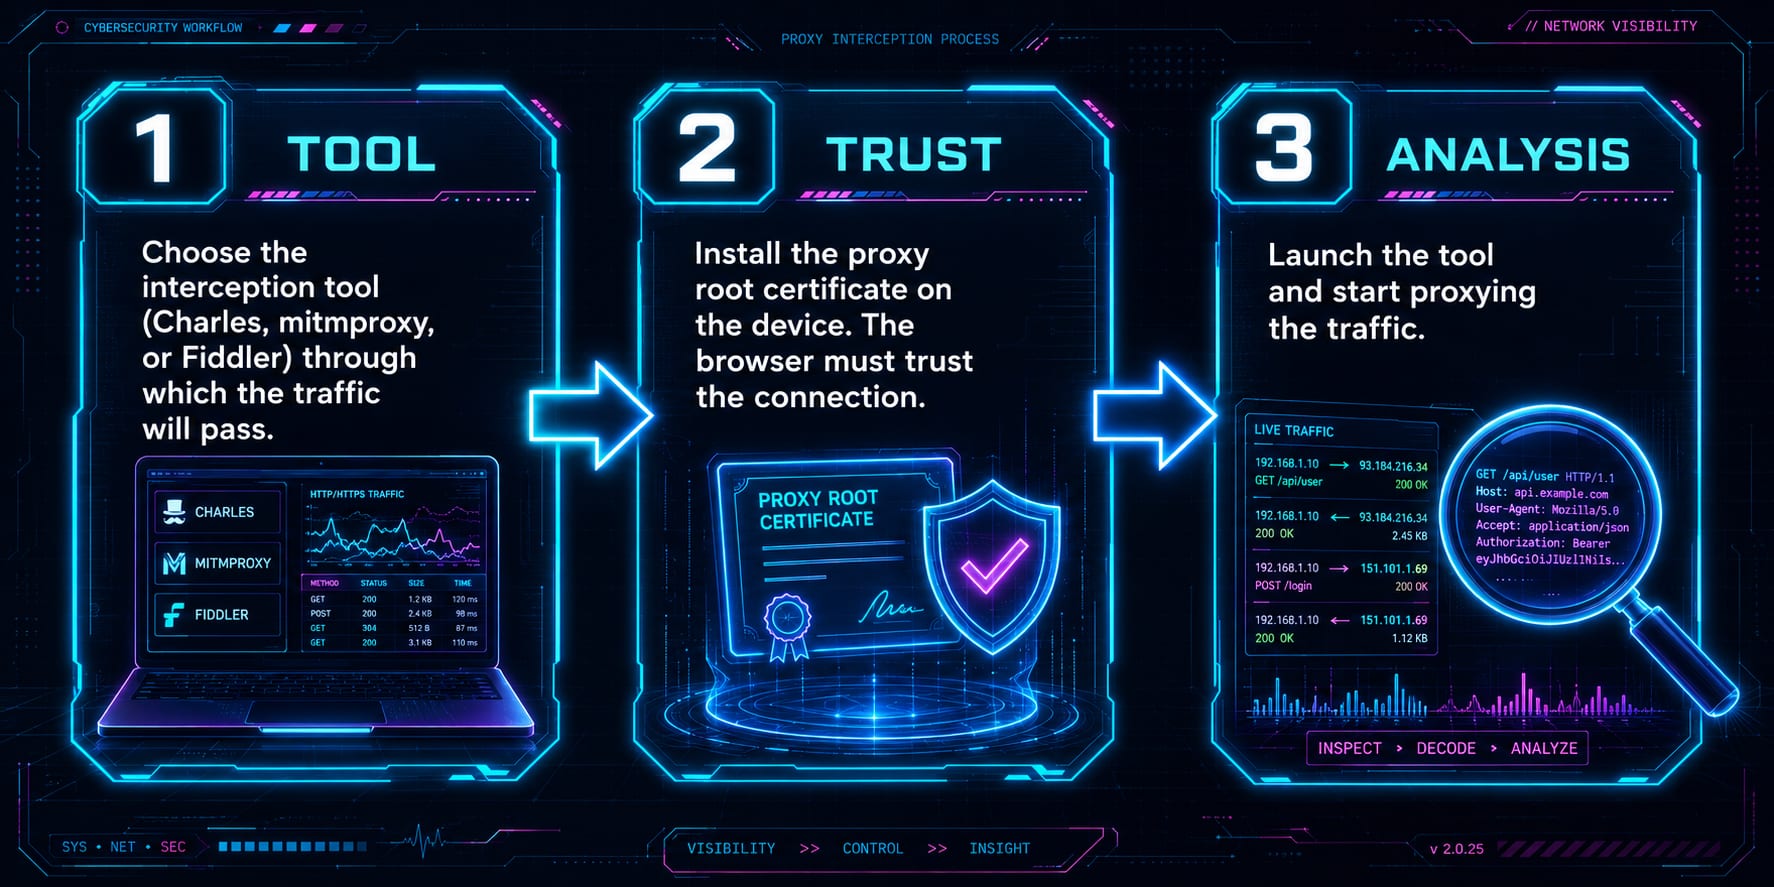
Step 1: Choose the Proxy Tool
For this lesson, we use Charles Proxy.
Other possible tools include:
- mitmproxy;
- Fiddler;
- Burp Suite.
Charles is convenient for teaching because the UI makes requests, responses, SSL settings, breakpoints, and block lists easy to demonstrate.
Step 2: Make the device trust the proxy
HTTPS cannot be decrypted just because you routed traffic through a proxy.
The emulator must trust the proxy certificate. Otherwise, the app or browser will reject the connection.
Step 3: Analyze the traffic
Once traffic is routed through the proxy and the certificate is trusted, you can start reading requests and responses.
6. Connecting Android Emulator to Charles
When Charles starts, it shows the proxy address and port.
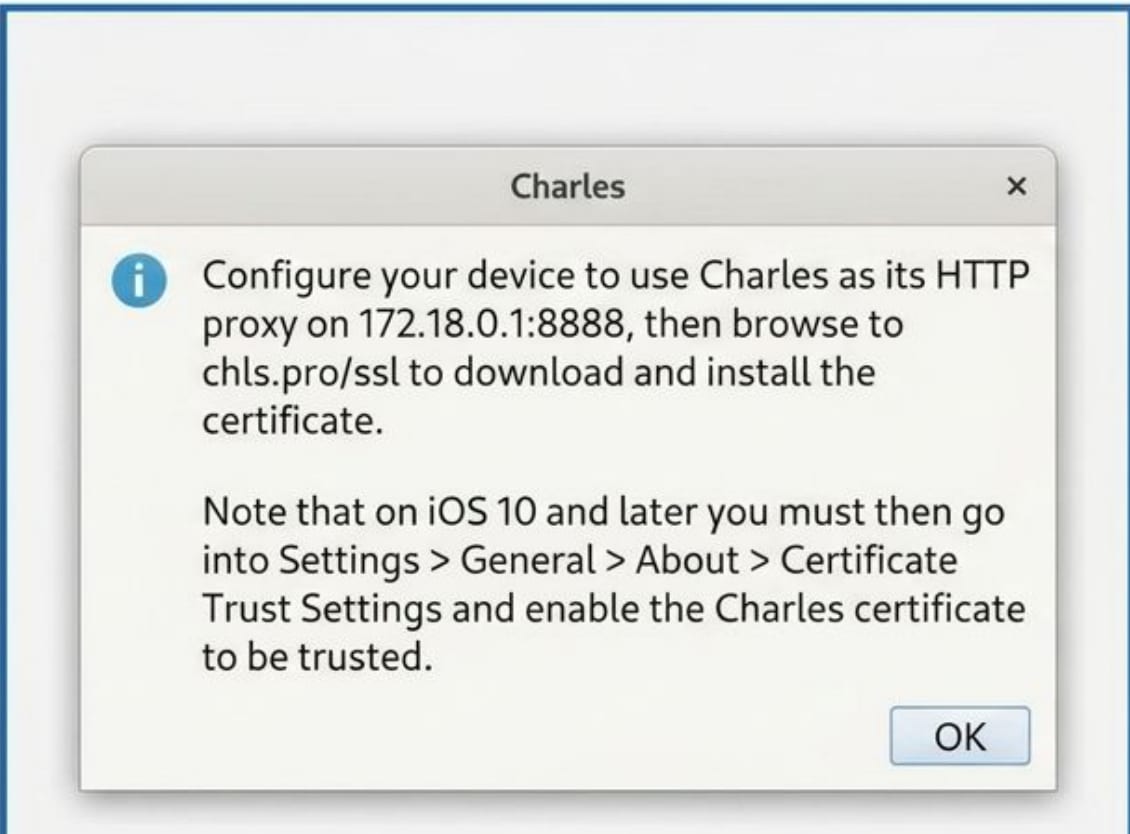
In this example, Charles listens on:
172.18.0.1:8888To configure the Android emulator proxy through ADB, use:
adb shell settings put global http_proxy 172.18.0.1:8888To remove the proxy setting:
adb shell settings put global http_proxy :0To check the current proxy value:
adb shell settings get global http_proxyImportant: your IP address can be different. Do not blindly copy 172.18.0.1 unless Charles shows the same value on your machine.
7. Installing the Charles CA certificate on Android
After routing traffic through Charles, open the certificate URL inside the emulator browser:
chls.pro/sslThe browser downloads the Charles CA certificate.
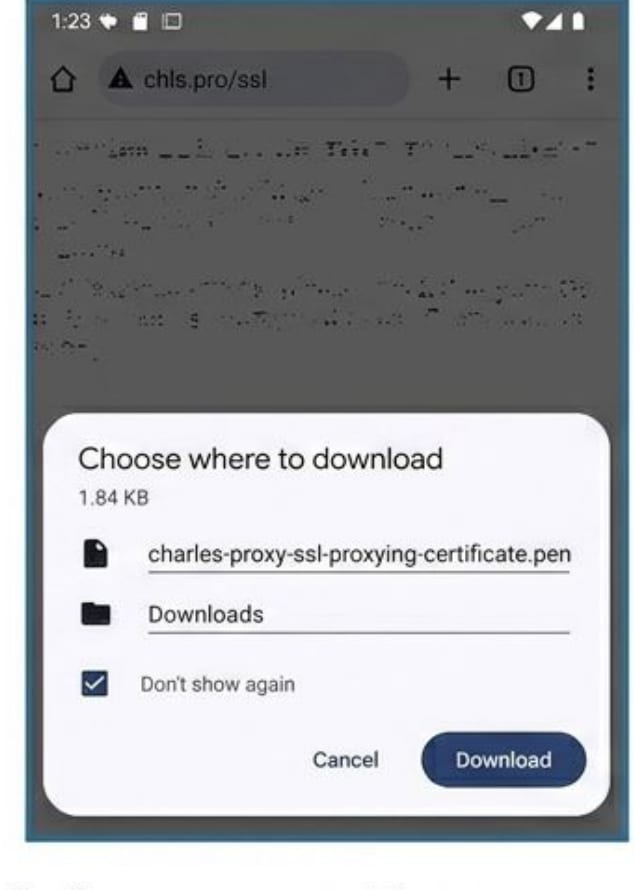
Android will warn you that installing a CA certificate can allow someone to inspect encrypted traffic. That warning is correct. In this lab, we intentionally install the certificate because we control the proxy and the emulator.

After installation, verify that the certificate appears under user trusted credentials.
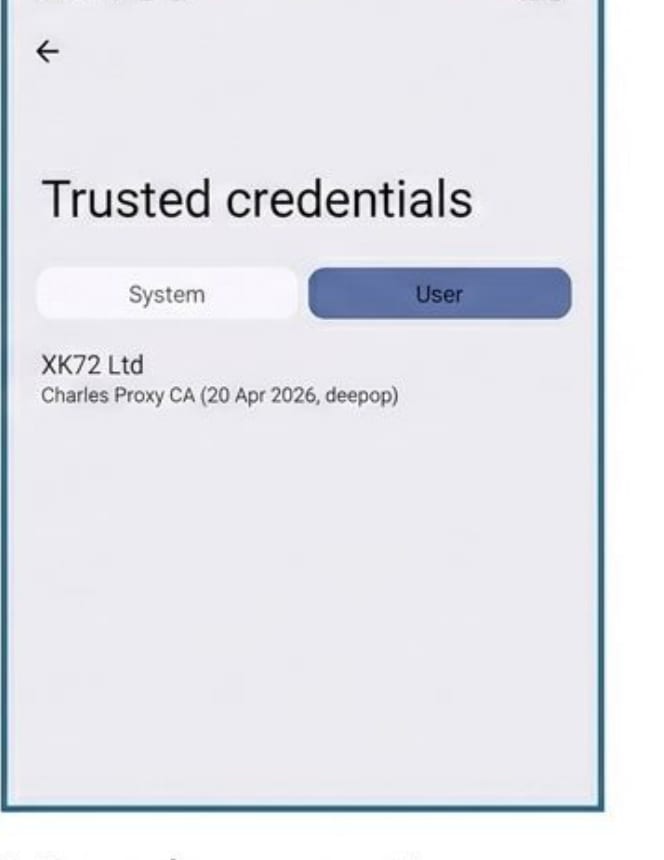
For a lab emulator, this is fine. Do not install random CA certificates on your daily phone unless you fully trust the source and understand the risk.
8. Why HTTPS still looks encrypted sometimes
Even after installing the certificate, Charles may still show encrypted or unreadable HTTPS traffic.
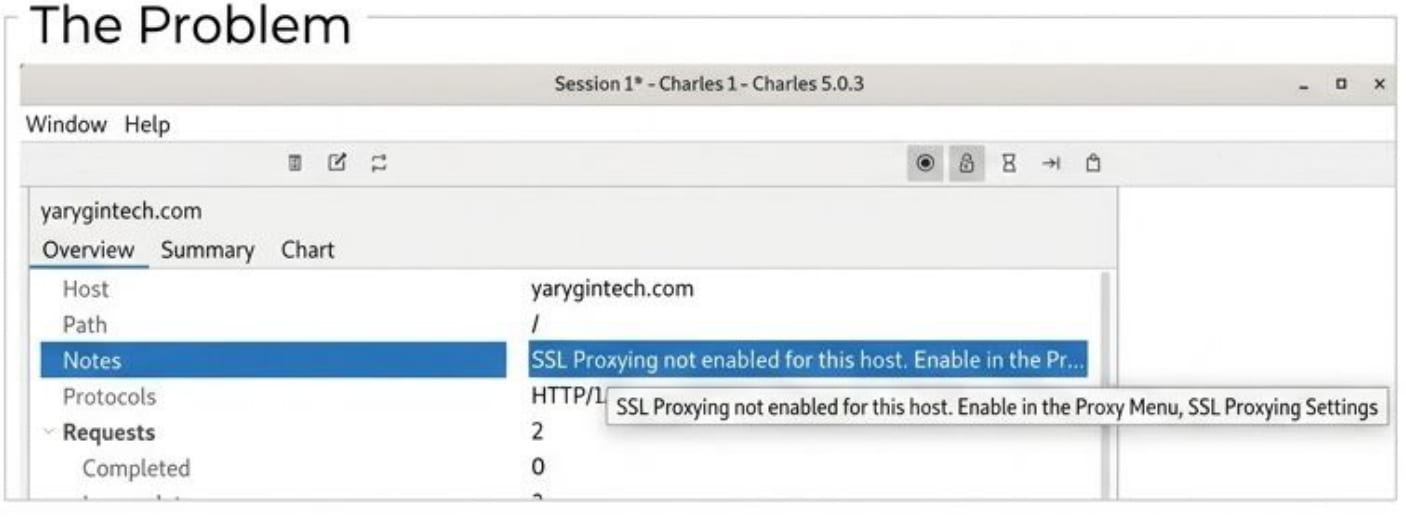
In Charles, you also need to enable SSL Proxying for the target host.
For broad lab testing, you can use:
Host: *
Port: 443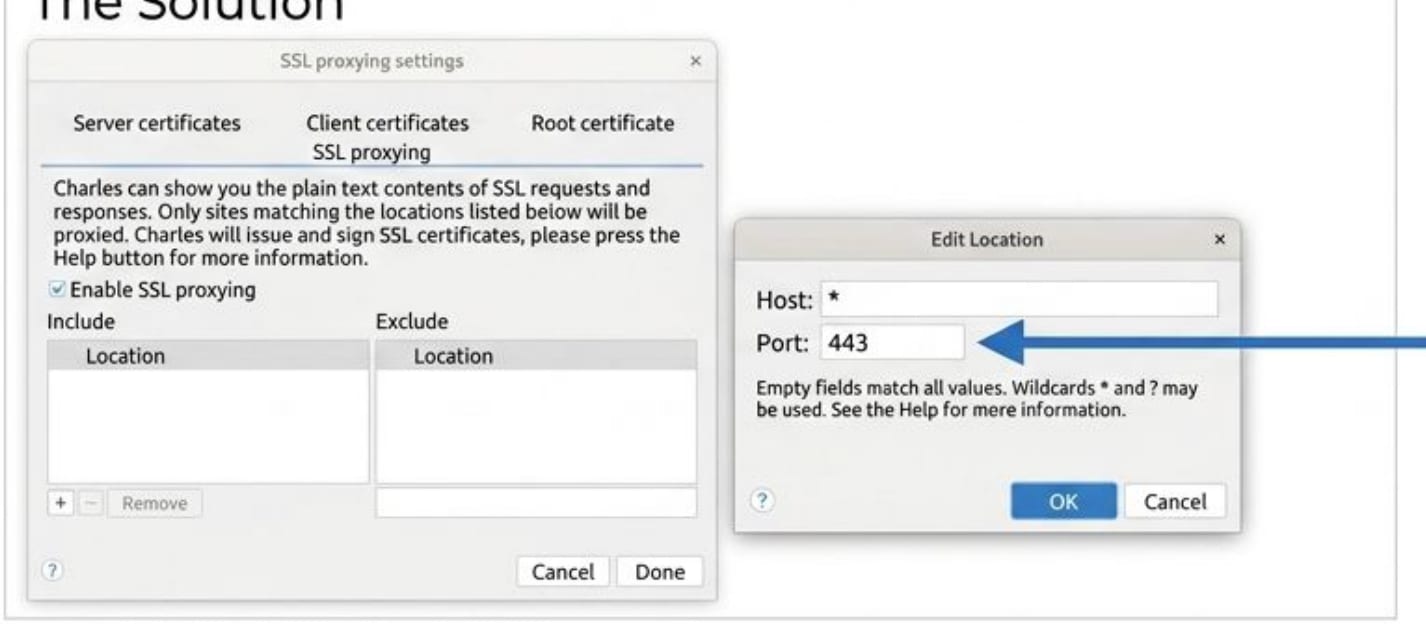
This tells Charles to decrypt HTTPS traffic for hosts matching the rule.
In a real work environment, prefer narrower rules when possible. Wildcard rules are convenient for training, but they can create a noisy session and may capture more than you intended.
9. Blocking requests to test app stability
Once traffic is visible, you can start testing failure scenarios.
One useful Charles feature is Block List.
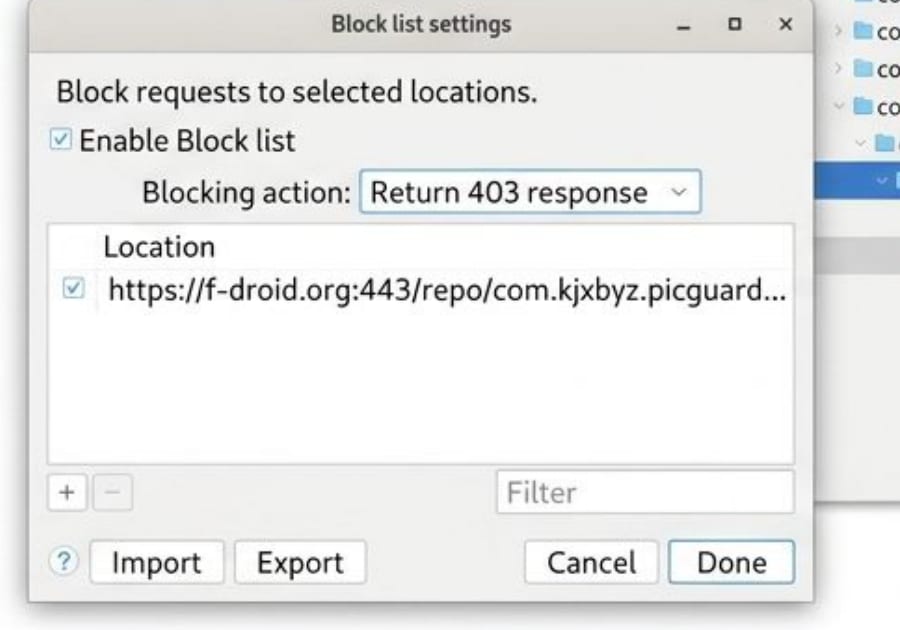
You can configure Charles to block a selected URL and return a specific failure response, such as:
Return 403 responseThis is valuable for crash and resilience testing.
Ask yourself:
- Does the app crash when the image endpoint fails?
- Does it show a broken placeholder?
- Does it retry forever?
- Does it show a meaningful error?
- Does it keep the rest of the screen usable?
Here is an example of an app screen after selected image requests are blocked.
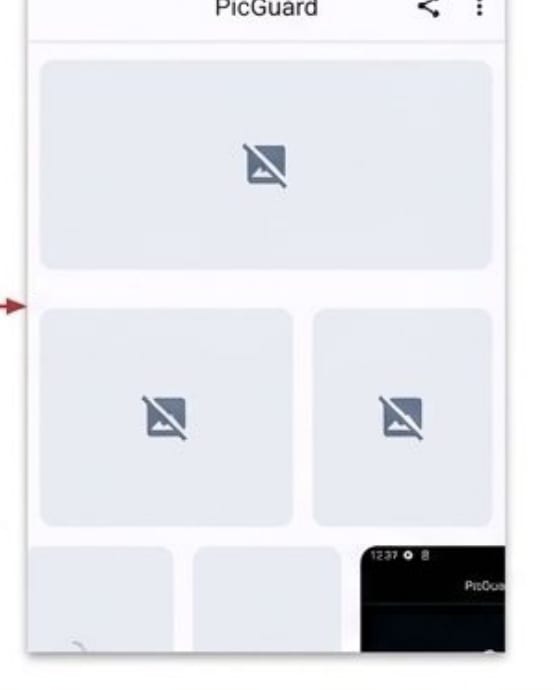
This kind of test is simple but effective. A lot of real production bugs are just bad handling of network failure.
10. Breakpoints: modifying traffic in real time
A breakpoint pauses a request or response while the app is running.
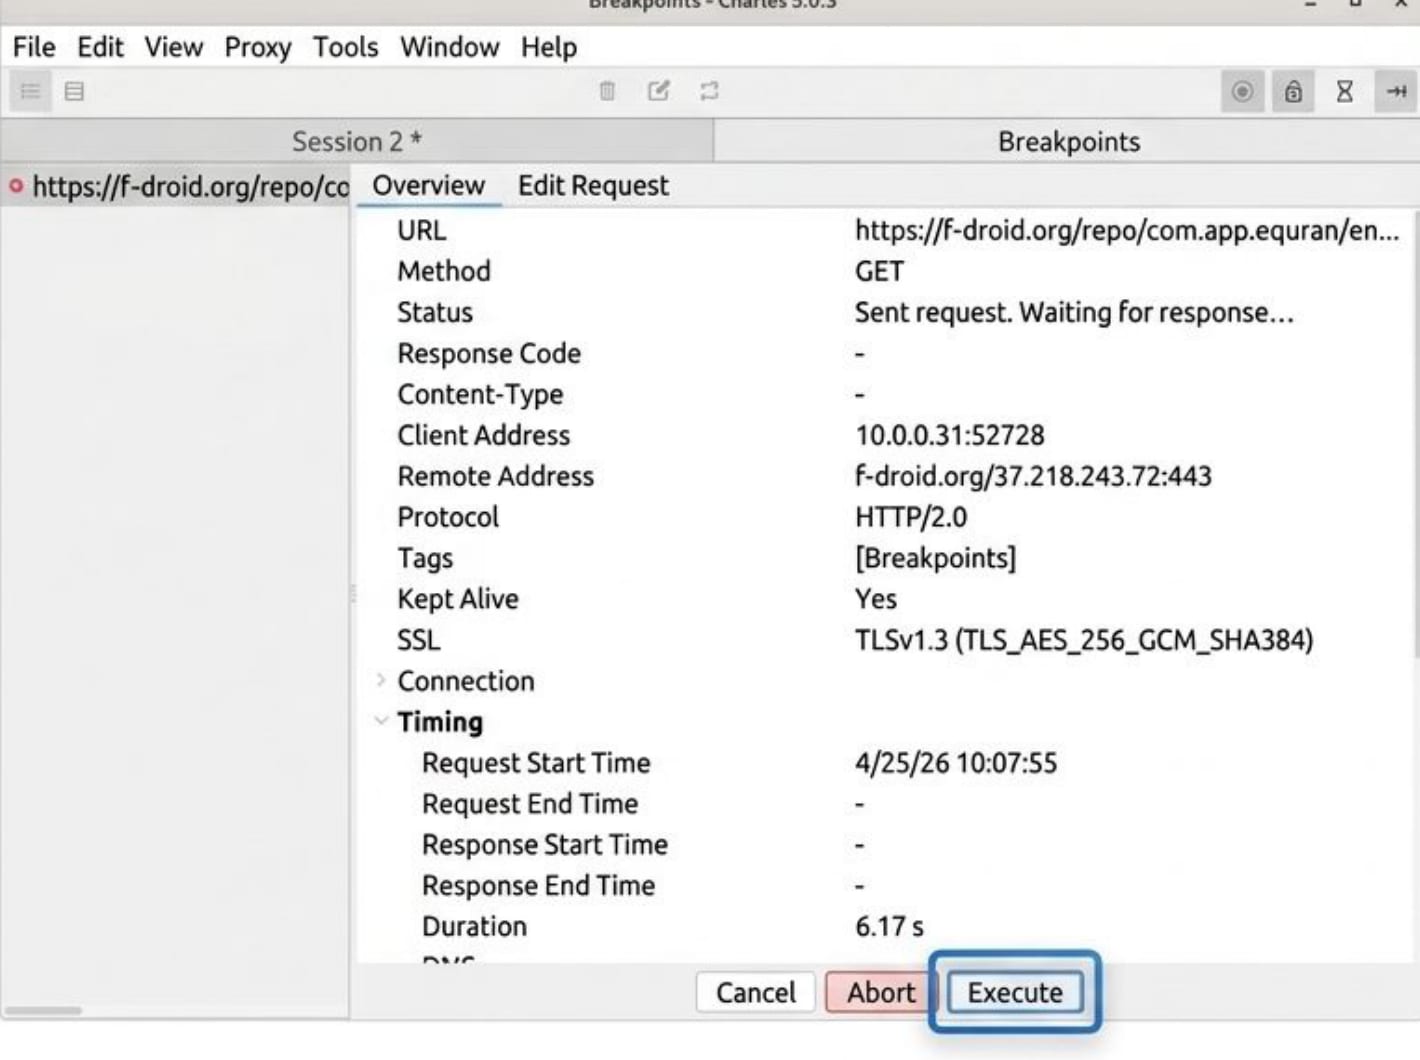
The flow is:
- The app sends a request.
- Charles pauses it.
- The tester edits headers, query parameters, body, or response data.
- The tester clicks Execute.
- The app receives the modified data.
This allows you to emulate backend behavior without touching the backend.
Examples:
- change a response code from
200to500; - remove a JSON field;
- change an account balance;
- simulate expired authorization;
- send an empty array instead of a populated list.
For QA, this is extremely practical. You can test rare backend situations on demand.
11. When Charles is not enough: SSL pinning
Some applications do not trust the system/user CA store. Instead, they pin a known certificate or public key inside the app.
That is SSL pinning.
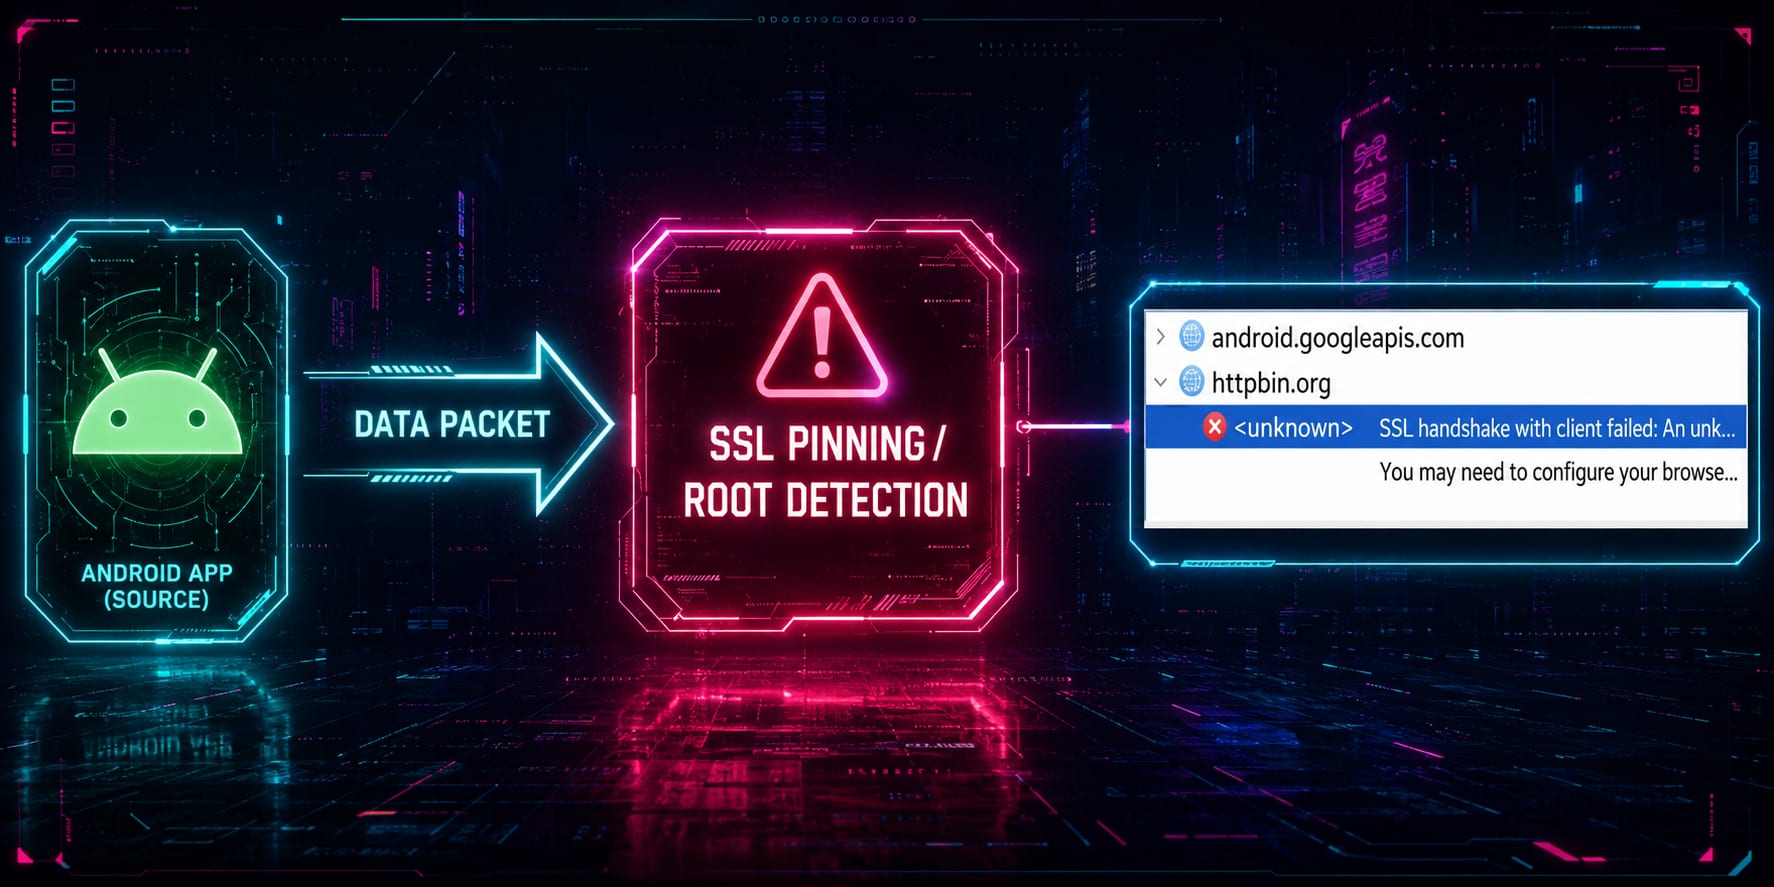
When SSL pinning is active, the app may reject the Charles certificate even if the emulator trusts it.
Typical symptoms in Charles:
Failedstatus;- unknown hosts;
- TLS handshake errors;
- no readable HTTPS content;
- the browser works through Charles, but the target app does not.
That means your proxy setup may be correct, but the app is defending itself against interception.
In a professional setting, this is expected in banking, finance, payment, and other sensitive apps.
12. Frida and Objection
When standard proxy interception fails because of SSL pinning, dynamic instrumentation can help in a lab environment.

Frida
Frida is a dynamic instrumentation framework. It lets you inject JavaScript into a running process and modify behavior at runtime.
In Android security labs, Frida is often used to:
- observe method calls;
- hook Java/Kotlin methods;
- bypass root checks;
- bypass SSL pinning;
- inspect runtime values;
- patch behavior without rebuilding the APK.
Objection
Objection is a runtime mobile exploration toolkit built on top of Frida.
For this lesson, the key benefit is convenience: Objection can disable many common SSL pinning checks with a ready-made command instead of requiring you to write your own Frida script immediately.
13. Disabling SSL pinning with Objection
A typical Objection workflow looks like this:
objection -g com.training.vulnerablebank exploreor, depending on the command style used in class:
objection -n com.training.vulnerablebank startThen run:
android sslpinning disable
If the bypass works, Charles should start showing decrypted HTTPS traffic from the app.
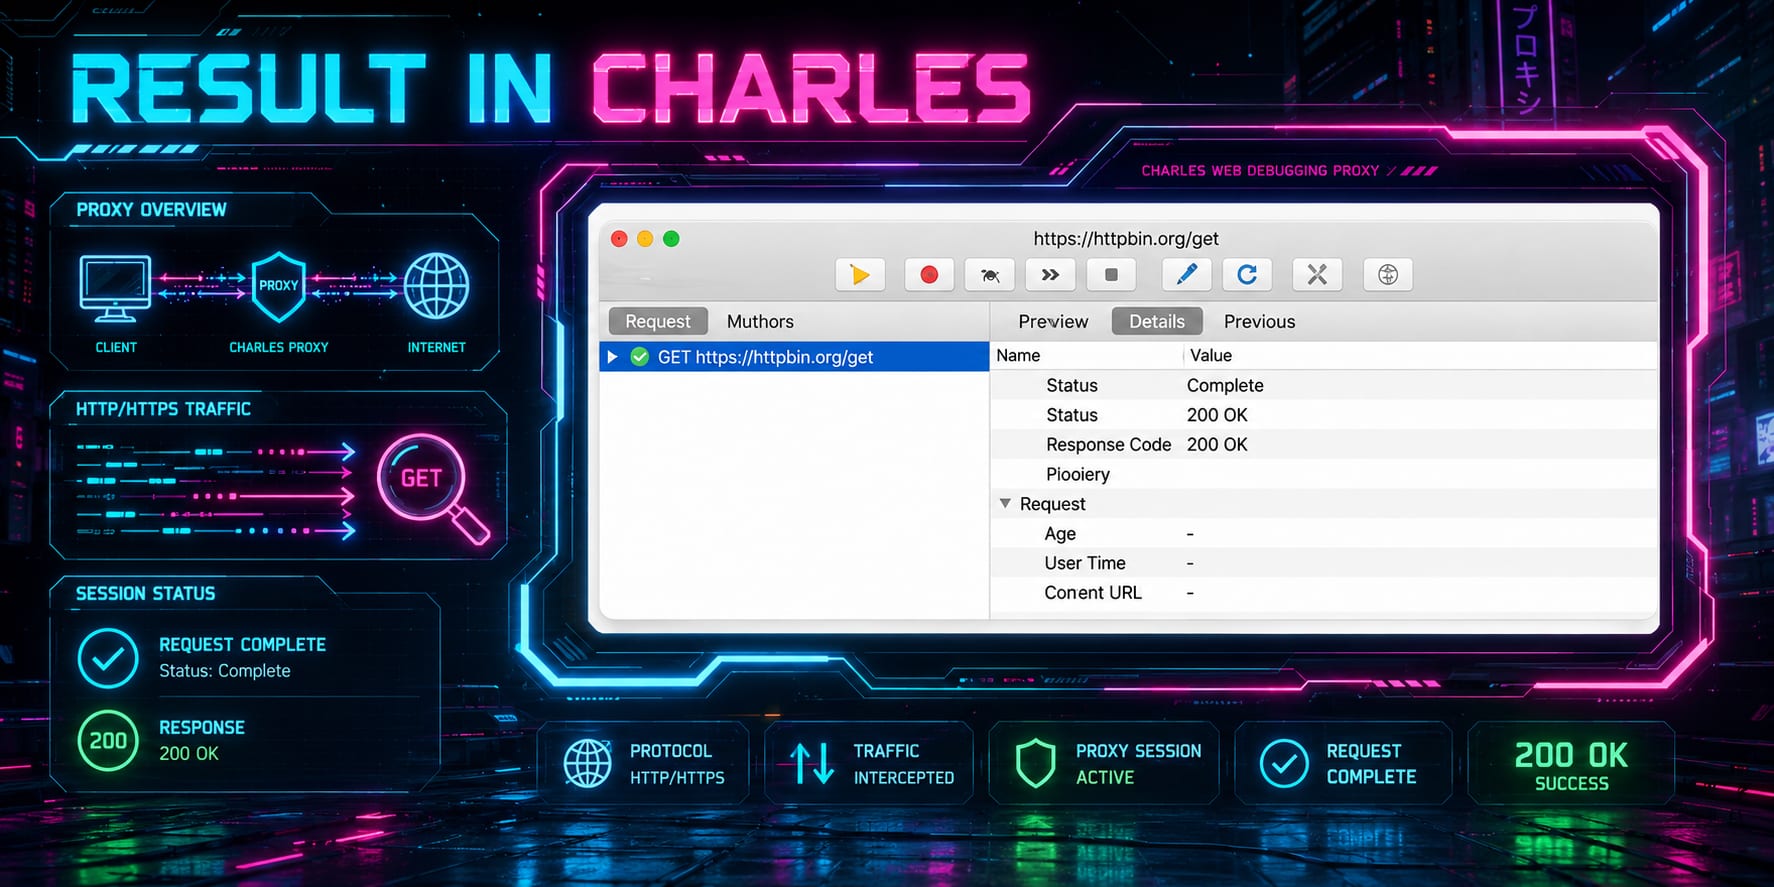
This is the point where the lesson moves from basic proxy setup into real mobile security testing.
14. Useful command reference
ADB utilities
adb root
adb shell ps -A | grep frida
adb shell ls /data/misc/user/0/cacerts-added/
Proxy configuration
adb shell settings put global http_proxy YOUR_PROXY_IP:8888
adb shell settings get global http_proxy
adb shell settings put global http_proxy :0
App launching
adb shell am start -a android.intent.action.VIEW -d https://example.com
adb shell monkey -p com.training.vulnerablebank 1
Frida and Objection
frida-ps -Uai | grep vulnerable
frida -U -n com.training.vulnerablebank
objection -g com.training.vulnerablebank explore
Installing Frida server on the emulator
Download the matching frida-server binary from:
https://github.com/frida/frida/releasesThen extract it and push it to the emulator:
adb push frida-server /data/local/tmp/frida-server
adb shell chmod +x /data/local/tmp/frida-server
adb shell /data/local/tmp/frida-server &
Common mistake: downloading the wrong architecture. For an x86_64 Android emulator, use an Android x86_64 Frida server build. For ARM64, use the ARM64 build.
15. Full analysis cycle
The complete workflow looks like this:
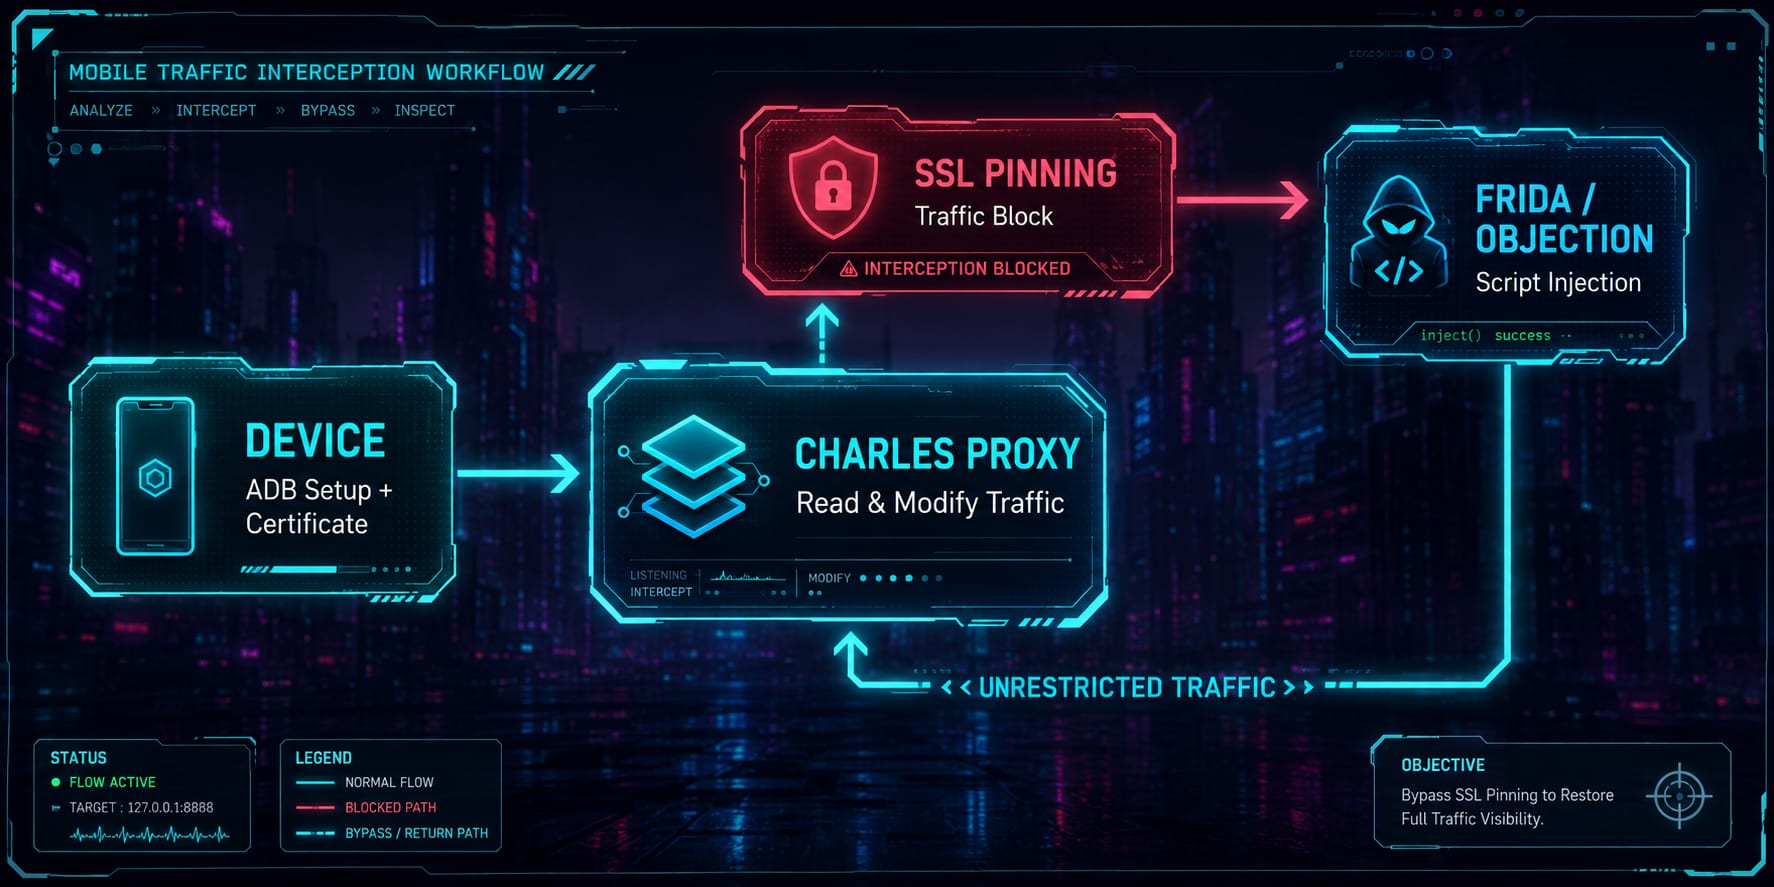
- Prepare the Android emulator.
- Configure ADB proxy settings.
- Install and trust the Charles CA certificate.
- Enable SSL Proxying in Charles.
- Capture and inspect traffic.
- Use Block List and Breakpoints to test edge cases.
- If SSL pinning blocks interception, use Frida or Objection in the lab.
- Confirm that decrypted traffic appears in Charles.
- Document the evidence with screenshots.
This is a clean first lesson because it connects QA, debugging, and cybersecurity into one practical workflow.
Homework: Mobile Traffic Interception Lab
Context
This homework assumes a Windows system and an Android emulator. The target app is the training APK:
vulnbank-debug.apkUse only the provided lab application and your own emulator. Do not test third-party apps without permission.
Goal
Set up a working Android traffic interception lab, then bypass SSL pinning for the training app and prove that app traffic is decrypted in Charles.
Required deliverables
Submit screenshots showing:
- Android Emulator running.
- Charles Proxy running.
- Emulator proxy configured.
- Charles CA certificate installed on the emulator (user certificate).
- Browser traffic visible and decrypted in Charles.
vulnbank-debug.apkinstalled and running.- The app opened on the transactions screen.
Network Connection Testexecuted.- httpbin traffic initially encrypted or blocked.
- Frida server running on the emulator.
- Objection connected to the app.
- SSL pinning disabled.
- App traffic decrypted in Charles.
Step-by-step tasks
1. Install Android Studio
Download Android Studio:
https://developer.android.com/studioInstall it and make sure Android Emulator is available.
2. Create a rooted Android emulator
Create an emulator using an x86_64 image. Recommended:
Pixel 9 + Google APIs imageUse a Google APIs image, not a Google Play Store image, because the lab needs root access.
3. Install Charles Proxy
Download Charles:
https://www.charlesproxy.com/download/latest-release/Start Charles and note the proxy IP and port.
4. Configure the emulator proxy
Use ADB:
adb shell settings put global http_proxy YOUR_PROXY_IP:8888
adb shell settings get global http_proxy
Replace YOUR_PROXY_IP with the IP shown by Charles.
5. Install the Charles CA certificate
Inside the emulator browser, open:
chls.pro/sslDownload and install the certificate.
Then verify it under Android trusted credentials.
6. Verify browser interception
Open a simple website in the emulator browser, for example:
https://google.comCharles should show readable HTTPS traffic after SSL Proxying is configured.
7. Install the training APK
Install the lab application:
adb install vulnbank-debug.apkLaunch it:
adb shell monkey -p com.training.vulnerablebank 1If the package name differs in your APK build, use the actual package name.
8. Open the transactions screen
Start the app and navigate to the transactions screen.
Then press:
Settings --> Network Connection TestCheck Charles. At this point, the target app traffic may still be encrypted or blocked because of SSL pinning.
9. Install Node.js and Python
Download Node.js:
https://nodejs.org/en/downloadDownload Python:
https://www.python.org/downloads/Make sure Python is available from the command line:
python --version10. Install pipx, Frida tools, and Objection
python -m pip install --user pipx
python -m pipx ensurepath
pipx install frida-tools
pipx install objection
Close and reopen the terminal if the command path is not updated.
11. Install Frida server on the emulator
Download frida-server from:
https://github.com/frida/frida/releasesChoose the correct Android architecture for your emulator. For most x86_64 emulators, use an Android x86_64 build.
Extract the file and push it to the emulator:
adb push frida-server /data/local/tmp/frida-server
adb shell chmod +x /data/local/tmp/frida-server
Start Frida server:
adb shell /data/local/tmp/frida-server &Verify that it is running:
adb shell ps -A | grep frida12. Connect Objection to the app
Find the package:
frida-ps -Uai | grep vulnerableConnect with Objection:
objection -g com.training.vulnerablebank exploreIf your package name is different, replace it.
13. Disable SSL pinning
Inside Objection, run:
android sslpinning disableThen press Network Connection Test again in the app.
14. Final proof
Your final screenshot must show both:
- the Android emulator with the training app;
- Charles showing decrypted app traffic.
Bonus task
Disable SSL pinning using a Frida script instead of Objection.
Requirements:
- Find or write a Frida SSL pinning bypass script.
- Run it against the lab app.
- Show decrypted traffic in Charles.
- Explain briefly what the script hooks or disables.
Grading checklist
| Area | Requirement |
|---|---|
| Environment | Android Studio and emulator are installed |
| Proxy | Emulator traffic is routed through Charles |
| Certificate | Charles CA certificate is installed and trusted |
| Browser test | Browser HTTPS traffic is readable in Charles |
| App test | Training app is installed and opened |
| SSL pinning | Initial app traffic problem is observed |
| Frida | Frida server is running on the emulator |
| Objection | Objection connects to the app |
| Bypass | SSL pinning is disabled |
| Evidence | Final screenshot shows decrypted app traffic |
| Bonus | Frida script bypass is demonstrated |
Troubleshooting notes
Charles shows no traffic
Check:
adb shell settings get global http_proxyAlso make sure the emulator can reach the host IP and that Charles is accepting connections.
Browser traffic works, but app traffic does not
That usually points to SSL pinning or app-level certificate validation.
Objection cannot find the app
Check the real package name:
frida-ps -Uai
adb shell pm list packages | grep vulnerable
Frida connection fails
Check that frida-server is running and that your frida-tools version is compatible with the server version.
Permission denied when starting Frida server
Run:
adb shell chmod +x /data/local/tmp/frida-serverThen start it again.
Final note
This lesson is the foundation for mobile traffic analysis. Once you can reliably capture, decrypt, block, and modify traffic in a lab, they can start doing serious mobile QA and security testing instead of guessing what the app is doing.